Aperture Visibility

Visibility of OLA and HCA Apertures in the JEOL JEM 3200FS

Because neither the HCA nor the OLA aperture sets sit exactly at a back focal plane of any of the lenses along the beam path (optical axis) of the EMC's JEOL JEM 3200FS, the individual apertures may be visible on the large phosphor viewing screen of the microscope and even in some recorded images (especially at low magnifications).

The two rows of images shown below were recorded at a nominal magnification of 2500x with the Gatan UltraScan 4000 CCD camera. This low magnification was chosen so that images of all the apertures at the same magnification and using the same imaging conditions could be acquired. The upper row shows the three OLA apertures while the bottom row shows the four HCA apertures. For these images, the beam was spread to near its maximum size.

This image shows the microscope's beam being focused through seven differently sized apertures.

The images within each row run from the largest aperture (left) to the smallest aperture (right). In terms of how the 3200FS functions, these are positions 1 thru 3 for the OLA and 1 thru 4 for the HCA.

NOTE: The white scale bar in the left image in each row corresponds to 2 μm.

These images are intended to show both the relative size of the different apertures and to give the user an idea of the magnifications at which the apertures might be visible: these images were recorded at the lowest possible mag mode magnification (2500x) but it should be clear that the smallest apertures could be visible at 10x or even 20x high magnifications.

There is also a very strong interplay between the convergence/divergence of the electron beam as it passes through the objective lens and objective lens apertures, and what the microscope user sees on the large phosphor screen or in images. When the electron beam is spread to its maximum width, it diverges (expands) as it passes through the objective lens. On the other hand, when the beam is spread so that it just fills any of the objective apertures, it most often (always?) converges (contracts) as it passes through the objective lens. Either condition produces the defocus-dependent change in magnification noted elsewhere. It also affects when the aperture is visible both on the large phosphor screen and in an image recorded using the CCD camera.

The following table illustrates this effect.

Magnifications Provided by the HCA and OLA Apertures
Aperture and PositionBeam SizeHighest mag aperture edge visible on CCD imageHighest mag aperture edge visible on large phosphor screen
HCA #1max width10k30k
HCA #1beam just fills aperture*8k25k
HCA #1parallel beam**never***never***
HCA #2max width20k60k
HCA #2beam just fills aperture*15k40k
HCA #2parallel beam**never***never***
HCA #3max width30k100k
HCA #3beam just fills aperture*15k50k
HCA #3parallel beam**15k50k
HCA #4max width50k200k
HCA #4beam just fills aperture*50k200k
HCA #4parallel beam**25k80k
OLA #1max width4k-5k15k
OLA #1beam just fills aperture*4k12k-15k
OLA #1parallel beam**never***never***
OLA #2max width10k30k-40k
OLA #2beam just fills aperture*6k20k
OLA #2parallel beam**never***never***
OLA #3max width20k50k
OLA #3beam just fills aperture*10k30k
OLA #3parallel beam**never***never***

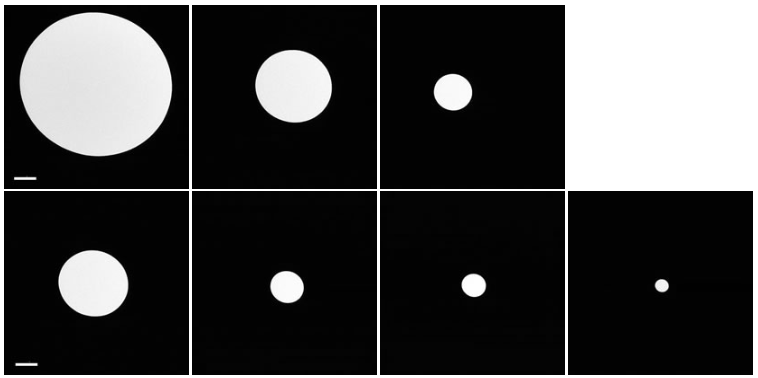
*the electron beam was determined to be convergent under this condition by comparing its size to that of the parallel beam.

**the parallel beam condition is approximated by going into diffraction mode, inserting any of the OLA apertures, focusing the edge of the aperture using diffraction focus and finally focusing the diffraction pattern using brightness (the condenser lens) control; this produces a beam that is not quite parallel, but is a very quick way to come very close to that condition.

***under this condition, the electron beam never illuminates the aperture edge.


From the information presented here, it is clear that magnifications "low enough" to make both the OLA and HCA apertures vanish from images are actually quite high, and care must be taken to ensure that images are not clipped by the edge of an aperture. The best way to do this is simply to record all images using the parallel beam condition (which also does a number of other good things in terms of image quality). This is harder to do than it sounds in actual practice, and so the user simply needs to remember that if the beam is not parallel, the aperture edge may appear in some images.